Roux
LSE: Edge Orientation
All that remains is to solve the last six edges (LSE). We can generally do this turning only the M slice and the U slice, which helps our speed considerably. A common approach is for the left fingers to control U - primarily the index finger but also the middle finger for U2 turns - while the right fingers control M - primarily the ring finger for M’, the middle finger for M, and both for M2.
In this step, we will orient the last six edges (the 4 on top plus the bottom 2 between the blocks).
Taking Inventory
First, turn the M slice so that the white or yellow center is facing up. Only then can we easily see if an edge is oriented (good) or disoriented (bad).
Second, count the bad edges using these two rules:
- An edge is oriented correctly if its yellow or white sticker is on the top or bottom of the cube. Otherwise, it is a bad edge that needs to be flipped. In other words, when all the edges are oriented, the top and the bottom of the cube will have only yellow or white stickers. Edges are always flipped in pairs, so there will be 0, 2, 4, or 6 bad edges.
- Don’t look at the DB edge. Five of the six edges are immediately visible, so the state of the hidden DB edge can be inferred without rotating the cube to look at it. If there is an odd number of bad edges visible, DB is also bad. If there is an even number of bad edges visible, DB is good.
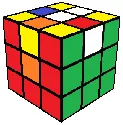
In this example, there are 3 bad edges on the top (UL, UF, UR). The UB and DF edges are good. Since the total number of bad edges must be even, then we know that the DB edge is bad even without seeing it.
Arrows and the Burden of Freedom
Orienting the edges is a flexible process. If you like, you can simply memorize the 11 cases and some algorithms that will solve them (chart below), and move on. However, if you understand how these algorithms work, it will help you solve the LSE more efficiently later on.
The case that is easiest to solve is an Arrow case: 3 bad edges on the top and 1 bad edge on the bottom. It is solved in just three moves.
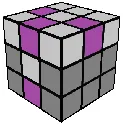
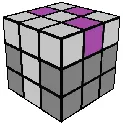
When you get an Arrow, the bad bottom edge can be on the front or the back. In either case, you turn the U slice so that the top “arrow” points to the bad bottom edge, bring the bad bottom edge up with M or M’, then orient all edges with any U turn move followed by any M turn.
- A Front Arrow can be solved
M'U'M'orM'UM'or a similar sequence that begins with M’. - A Back Arrow can be solved with
MU'M'orMUM'or a similar sequence that begins with M.
Arrow Example
In our earlier example, we have a Back Arrow case which can be solved U2 MU'M'. The result is shown below.
U2 MU’M’
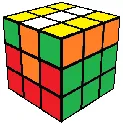
Our five visible edges are all good, so we know the DB edge is also good. This completes edge orientation.
Other Cases
We solve the other cases by cycling through the various cases until we get an Arrow case. We use two algorithmic tools to do this:
M'UM'flips the orientation of the UL, UF, UR, and DF edgesM'U2Mswitches the position of the UF and DF edges (it also trades UL with UR, which does not affect orientation)
These tools are the building blocks of algorithms used to solve edge orientation. The chart below lists the 11 cases for edge orientation, along with the cycles and algorithms for each case.
Edge Orientation Cases
After counting the bad edges, turn the U layer until your edges match one of the 11 cases below. The purple edges are bad.
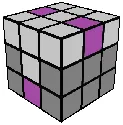
Cradle
(M U2) (M' U2) (M' U' M')MU2M'cycles to Front Arrow
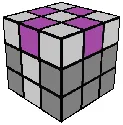
Cross
(M' U2) (M' U2) (M' U' M')M'U2M'cycles to Front Arrow
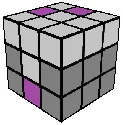
Stinger
(M2 U') (M' U' M')M2cycles to Front Arrow
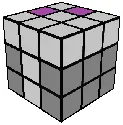
Neighbors
(M' U M') U2 (M' U' M')Alternates
U (M' U' M') U2 (M' U' M')
M'UM'cycles to Front Arrow
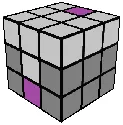
Front Diagonal
(M' U' M) U' (M' U' M')MU'Mcycles to Front Arrow
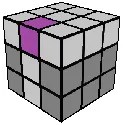
Back Diagonal
(M' U' M') U' (M U' M')M'UM'cycles to Back Arrow
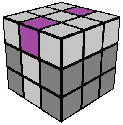
Top Pair
(M' U M) U' (M' U' M')Alternates
(R U R' U') M' (U R U' r')
M'UM'cycles to Stinger
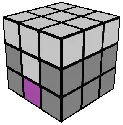
Bottom Pair
(M' U M') U' (M U' M')Alternates
(M' U' M') U (M U' M')
M'UM'cycles to Back Arrow
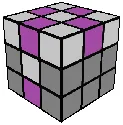
All Bad
(M' U' M') U2 (M' U' M) U' (M' U' M')Alternates
(R U' r' U') M' (U r U r')
M'UM'cycles to Front Diagonal
Front Arrow
(M' U' M')M'U'M'solves (so doesM'UM')
Back Arrow
(M U' M')MU'M'solves (so doesMUM')